

Setup
1) Skates parts
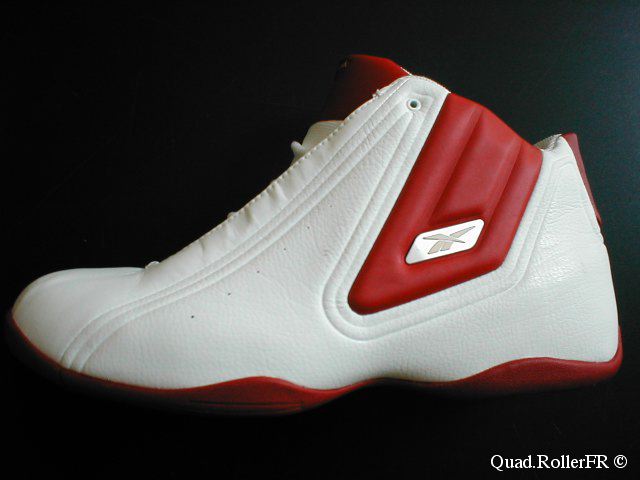
– Reebok `Mad talent’ shoes (2003)
– Lazer `Jumper T3 8mm axles’ plates, Hawaii Surf

– Hyper `Rollo 62mm 78a’ wheels, Hawaii Surf

– SKF bearings `Stuntmaster’, SKF
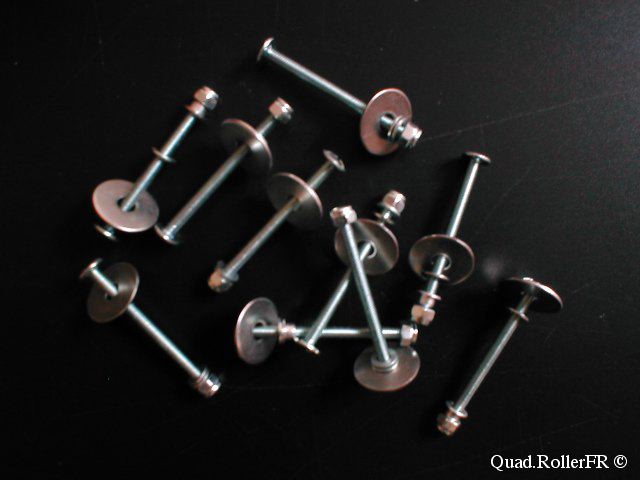
2) Assembly parts
– 10 round head screws, 4mmx50mm : for fixing the plates to the shoes,
– 10 `medium’ washers : to prevent the screws from getting through the soles,
– 10 `small’ washers : between the plates and the nuts,
– 4 special washers (optional) : for the `jumpers’ rear holes,
– 10 `nylstop’ nuts : for fastening the assembly,
– 2 classical nuts : can be used during assembly to hold the plates,
– 3mm dural plates : between shoe and `jumper’ plates,
– 8 inox medium washer s: for the wheel axles of the 8mm lazer trucks.
3) Necessary tools
– e.g. pen or fibre-tip : for marking the holes to be drilled on the soles,
– punch : for preparing the holes to be drilled,
– drilling machine : for drilling the holes,
– 3 drills (6mm, 6mm for metal, 8mm for metal) : for the shoes and dural plates,
– cross tip screwdriver : for holding the rear screws,
– knife : for holding the front screws,
– 7mm and 17mm flat wrenches : 7mm for the fixing screws, 17mm for tuning the truck gums,
– 7mm, 13mm and 17mm socket wrenches : for the fixation axles, the wheel axles and the truck axles,
– portable jigsaw,
– multiple slip joint pliers,
– file.
4) Choosing the skate parts
a) Shoes
See the article previously released at www.RollerFr.net (in French…), on choosing sneakers for quad skating. In this paper, the shoes have been chosen for the following features :
– a rigid sole : warrants a reliable assembly as well as a precise driving of the plates and limits energy loss,
– vamp quality : leather provides containment and long-lastingness,
– high cut and lacing : allows proper blocking of the heel in the shoe,
– price : 90 euros, not bad for quad skating shoes. We could have found much more expensive yet vastly poorer shoes !!!
b) `Lazer’ plates : a reference in quad-dom
For many years, I had been skating on Dikers `Star Master’. But after breaking many `new generation’ trucks, I decided to change.
I chose a `Jumper’ for its thicker base. Being 1m86 tall (6 feet) and weighing 86kg (190 pounds), I would have twisted a `rando’ plates on each single jump. And as I’m a complete jenny, I chose thicker 8mm wheel axles, which additionally allow using well spread bearings.
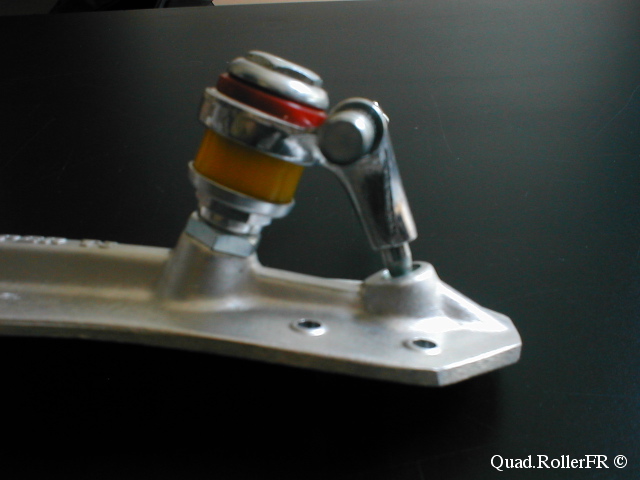
As for the size, note that a T3 jumper = T5 rando, i.e. 170mm spacing between the wheel axles. For information:
– a T4 rando feature a 160mm spacing,
– a T5 jumper feature… hum… definitely way too large! OK, I wear size 45 shoes (UK: 11), but it’s hardly a good reason to skate on plates the length of a highway truck !
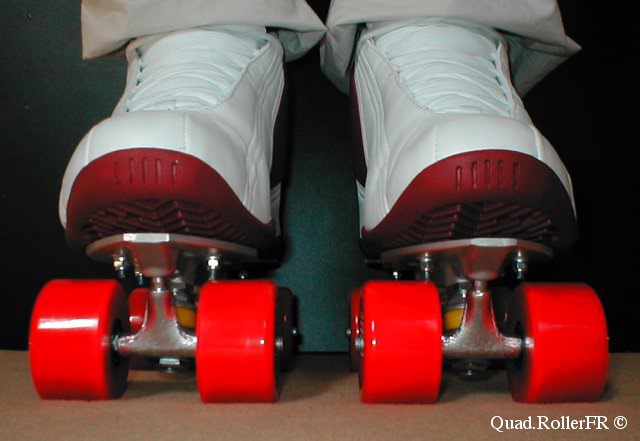
c) Hyper `Rollo’ wheels
I just love those wheels. Their square profile and hardness make them faster wheels than the Kryptonics. However, behold : they’re less comfy.
d) Bearings
I was looking for real bearings, effective, fast, and rock solid. SKF is value for money. Choosing aggressive bearing, I trust I’m on the safe side in terms of solidity.
Assembly of the quadskates
A good assembly requires the following steps :
1) REGISTRATION
a) Definition
Registration is simply the act of putting the plates under the shoe and finding the optimal positioning. This positioning determines the quality of the resulting skate. It can vary depending on the target skating style.
– Laterally : centre both the rear and front ends.
Variant: for jumping, the plates can be slightly turned outwards on the front side. This allows for keeping the feet parallel when going up the springboard and therefore provides a more powerful extension.
– Longitudinall y: place the rear axle right under the lateral malleolus.
Variant 1 : slalomers and dancers place the plates a bit further behind for more stability
Variant 2 : jumpers place the plates a bit more to the front for a more efficient approach
b) Procedure:
– Put the wheels on the relevant axles,
– Put the whole on a table,
– Place the shoe on top of the plates. By making it easy to access any point of view, this technique allows for fine tuning the positioning of the shoe relative to the plates.
2) Drilling
a) Marking
Once the registration is done :
– Firmly hold the `shoe/plates’ entity,
– Remove the wheels,
– Flip the whole,
– Mark only the rear holes.
As a safety measure, repeat the registration step and check that the markings are correct.
b) Drilling the rear holes
The holes are accurately and clearly marked on the sole.
– Prepare the holes using a punch. This will prevent the drill from sliding when starting drilling, and therefore ensures the holes are drilled at the right position.
– Drill these two holes.
Warning : take care of drilling orthogonally to the shoe, in 3 dimensions. A slanted hole would induce an early wearing of the plates’ holes.
NB: if you mount a Jumper like in this paper, drill only the two rearmost holes.
c) Drilling the front holes
Fix the rear end of the plates to the shoe, using screws and classical nuts. This will help registering the front holes.
Then again, put the wheels on the axles and make a new registration.
(If the rear holes have been drilled properly, the plates is positioned correctly and you just need to do the marking).
Finally, remove the wheels, flip the whole, mark the holes on the sole, remove the plates, punch, drill.
NB : if you’re mounting a Fiberlite plates, there’s only 2 front holes. Other plates (Lazer, Diker, Star master, Roll’line…) have 4. Drill only 3 of them: the two front-most, and a third one on the exterior side. It’s useful for lateral containment, in particular during slides.

d) Drilling the second foot
Now that the first foot is drilled, put on the screws, plates and wheels. The second foot is measured by symmetry. The method ensures that the two skates are always built the same. Whatever error has been done on the first foot will be reported on the second. This way one always ends up with consistent skates.
For this registration, put the two skates-to-be next to one another on the table. Proceed with the registration. Once you are satisfied with the symmetry, do the flipping-marking-rechecking-drilling bit.
NB: Don’t hesitate using the assistance of a friend. A second person is likely to catch the mistakes you may have done alone.
Dural plates
If, like me, you have big feet and want a short plates, adding a thin metal plate between the plates and the shoe is mandatory. This holds true even in the case of the Lazer `Jumpers’. However, you don’t need to cover the full length of the foot: taking care of the heel is sufficient.
1) FOOTPRINT
– Buy a 3mm thick dural plate (at `Weber métaux’ [translator’s note: if you happen to leave in Paris, that is]),
– Put the shoe on a sheet of paper,
– Draw the contours of the shoe.
2) CUTTING
– Allow 5mm inside the contour to avoid ending up with too wide a plate,
– Report this new contour on the dural plate,
– Place the plate on a flat surface,
– Cut the plate using a portable jigsaw,
– File the edges of the plate to prevent injuries.
 3) Drilling

– Place the dural plate between the plates and the shoe,
– Perform a registration for the holes,
– Drill these holes using a proper 6mm metal drill,
– Use the holes on the first plate as guides to drill the second one.
Enlarge these holes using the 8mm drill. Don’t hesitate drilling wider holes than the screws are thick: the idea is to prevent the plates from damaging the screws by friction.
NB : don’t prepare the plates earlier. The shoes must be drilled so you know exactly what you’ll be ending up with. This will ensure that the dural plates are placed correctly between the shoe and the plates.
ASSEMBLY – TUNING
Both shoes are drilled, the dural plates are ready: we are up for assembling the skates, following these steps :
1) Mounting the shoes
– Introduce screws in every hole,
– Position the dural plates under the heels,
Be careful of using the right plate for each foot !!!
– Put on the plates, starting with the front screws and ending with the rear screws.
– Add 2 small washers on each screw. This ensures friction occurs against these washers and not against the plates.
Screwing must be done evenly on all screws simultaneously. This will prevent efforts from concentrating on a single screw, potentially breaking it upon rock or jump landing (shoes without plates look so odd in the subway!!!).
Once all screws are fastened :
– Take the pliers,
– Hold the screw 5mm above the nut,
– Break the excess length of the screw by bending it in several directions. This will damage the screw thread and prevent the tired nuts from falling down on the sidewalk.
2) Mounting the wheels
– The 8mm axles on the `Lazers’ are badly machined. It is therefore not possible to mount the wheels directly. The addition of washers, onto which the bearings will rest, is warranted.
– Spacers ? Useless. I can’t stress this enough: no need for spacers !!! They are never of the right length anyway.
As a matter of fact, I have quad-skated for more than 15 years without ever breaking a single bearing, so you can trust me on this.
– Tightening : fasten slowly each wheel while spinning it. The noise will tell you when you’ve gone too far. At this point, untighten by a quarter of turn, and up you go !!!
3) Tuning
Put on laces, insoles, additional tongues …
Once all of this is done, I recommend you put your skates on in your kitchen, on some hard ground. Use the walls to prevent yourself from falling and and check that the trucks are tight to your taste. If it’s not the case, use the 17mm keys for tuning them.
NB : do not tighten too strongly initially. This new skate will require some time from you to adapt to them, but also from your plates and their gums. If you tighten completely, chances are your skates won’t go straight ! A quad-skate barely ever goes straight, just allow some time for everything to get smoother.


Conclusion
We’re now up for some testing.
As of writing, i.e. after a few months (hum… almost 2 years, actually !!!), my overall impression is very positive :

Pros:
– Shoes : containment, solidity, comfort.
– plates : precision, solidity.
– Wheels : perfect, nothing to say. I love these wheels !
– Bearings : perfect !!! Thanks to SKF. I’ve never had such good bearings.
– Assembly quality : well, it’s from Hakim and myself! Therefore…
– Overall performances : personal record in high jump broken + 4th position at French Championship 2003, on the first day of use.
Cons:
– Shoes : white is soon not so white.
– plates : the trucks are of poor quality. Even without jumping, the truck axles start flapping around inside the trucks.
– Wheels : /
– Bearings : /
– Assembly quality : not fit for slalom due to a front mounting of the plates.
– General performances : /
100% Quad
Special thanks to Lot for this incredible translation and for his totally insane patience !
Forum’s discussion